
Installing Software But before we can start programming your robot, you need some software.Ideally, I would like to give you just one single program to download and everything will work right away. This is the idea of WinAVR (22.8mb), as when you download it (yes, please download and install it), you get everything you need in one go. It will install a bunch of useful programs all in one location, including GNU Compiler Collection (GCC), GNU Binutils, avr-libc, avrdude, avrice, and a few others. Its all seamlessly built in, so I wont even bother you about them. For more information, check out the WinAVR user manual. Don't install Programmers Notepad, its useless if you use AVR Studio, and has been know to be buggy in previous versions.
The next program I will have you download is an IDE (Integrated Development Environment). Atmel (the producer of the microcontroller you are using) offers this software, AVR Studio, for free. This IDE has a built in editor, compiler, uploader, etc all in one package.
Now that we have installed all the essential software, lets set up AVR Studio. Find the new AVR Studio 4 icon in your start menu, click, and you should immediately see this window come up:
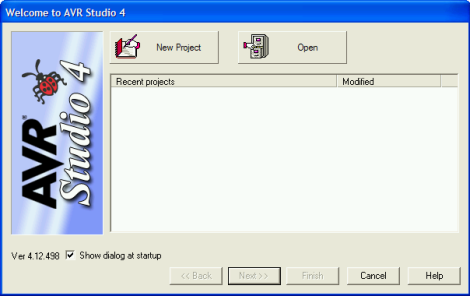 Select 'New Project'
 The next window that comes up will look like this:
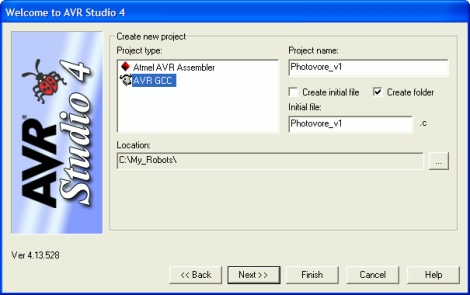 Copy the options that I have chosen. Make sure there are NO spaces in the file name. For example, do not do 'C:\Documents and Settings\User\Desktop . . .' Also, the project file name must be the same name as the initial file. There is a 'feature' (bug) in AVR Studio that will cause you problems otherwise. After clicking Next, another window should come up:
 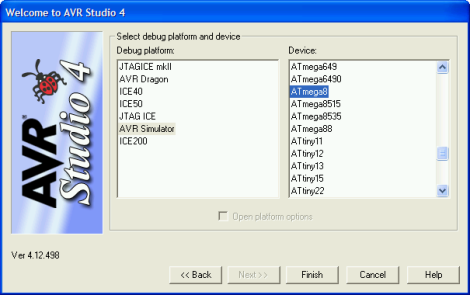 Select AVR Simulator, and choose ATmega8 on the right. Click Finish. AVR Studio should now load and look something like this:
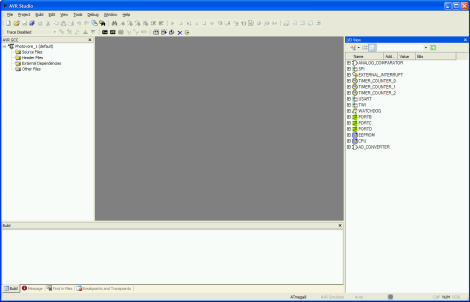
SOURCE CODE Now you need to download the source code. Currently, I offer just one program for your robot, but plan to come out with others later:Photovore v1.zip (March 10th, 2007) - Case-based photovore program
 Empty the contents into the proper folder. For example, for Photovore v1, empty all files into C:\My_Robots\Photovore_1 Optional: You can also download AVRlib (1.5mb), which is a huge library of free AVR source code to make your life easier. For more information, view the online documentation for AVRlib.
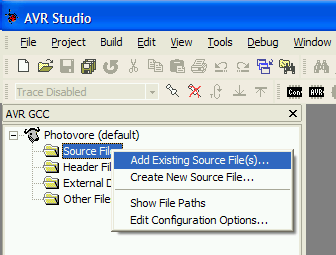
 Now we need to add in the source code that you downloaded for AVR Studio. Right click 'Source Files' and left click 'Add Existing Source File(s)...'.
 Locate Photovore_v1.c in your Photovore folder, and add it. You could also just drag and drop. The source code file is the one you would want to edit if you wanted to reprogram what actions your robot takes. Just like with the source files, now right click 'Header Files' and left click 'Add Existing Header File(s)...'. Locate SoR_Utils.h in your Photovore folder, and add it. This header file is filled with a lot of useful functions I wrote up for you.
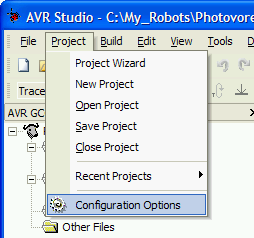
 Now we must set up the options to compile your source code. Go to Project -> Configuration Options.
 Check the box that says 'Use External Makefile' and then browse to locate the makefile (the file in the downloaded source code labeled 'makefile'). Then push OK.
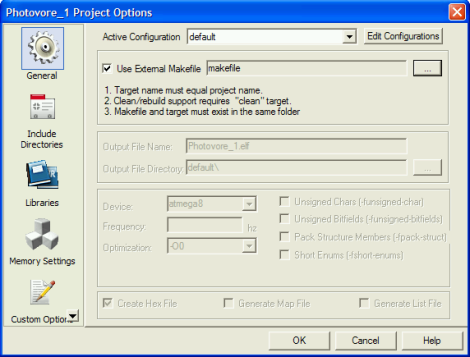
The final programming step is to compile the code. This converts your code written in C to machine code in a .hex that only your specific microcontroller can read. You should do a Rebuild All the first time you compile the downloaded source code. But after that, if you only make changes to the .c source file, you only need to do the faster Build command.
 If all went well, you should see this message after compiling:
 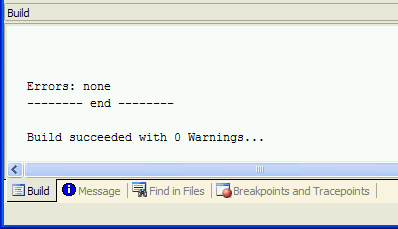 If you get errors, and you are new to programming, it may be a little difficult to debug at first.
 Now we need to upload the .hex file you just compiled to the microcontroller via the AVR STK Serial Port Dongle Programmer. To do this, you need to download the newest version of PonyProg2000: v2.06f BETA. For more info on the program, check the PonyProg Documentation.
 After loading up PonyProg2000 again, you want to select 'Open Device File.' This is the beige folder looking button at the top left. Then go to your folder that has all your source code, and select/open the .hex file.
 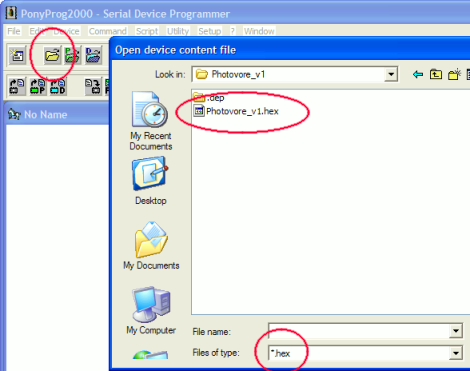 You might also need to configure which COM port you have the programmer plugged in to (serial port), as well as select ATmega8 as the microcontroller. My laptop has like 8 different USB ports so I had to try a few before it worked (I'm using a USB to serial adaptor).
 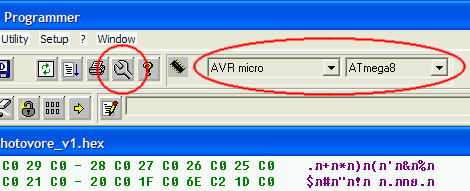 If you aren't sure which COM port to use, click: Start->Settings->Control Panel->System A new window will come up called 'System Properties'. Open the Hardware tab and click device manager. You should see this:
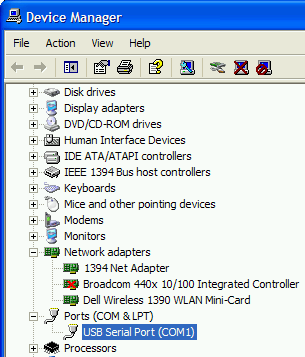
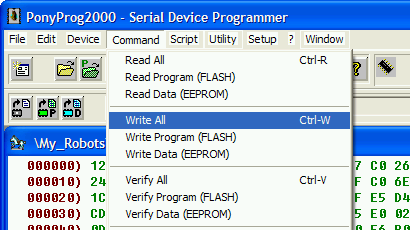
Plug in your AVR STK Serial Port Dongle Programmer to both your computer and your robot if it isn't already from Step 3C. AFTER plugging your robot in, turn on the microcontroller by flipping the ON/OFF switch, or plugging in the battery if it doesn't have one. If you were to unplug the programmer, make sure you turn off your robot first.Now select 'Write All' from the drop down menu. A Yes/No window will come up, select Yes. Wait while the program uploads.
 If you didn't select the correct port to use for your programmer (because you still aren't sure), or you forgot to turn your robot on, you will get this error:
 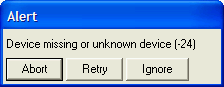 Try plugging in your programmer to a different port of your computer and then push Retry. Try each COM port until it works. What the error means is that it is not detecting the programmer for at least one of these reasons: A) programmer not powered up (check voltages) B) you are telling it to use the wrong port (check device manager) C) you have another program running that is using the same port (close other programs)
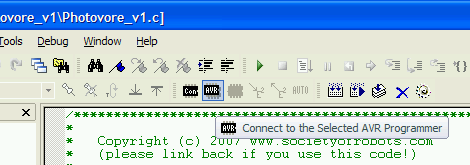
 update: There is a known problem with PonyProg2000 that it won't work with a USB to serial adaptor. You might also be interested in this forum post,After programming, hopefully, your robot now suddenly tries to commit suicide by driving off your table. Your are done! Congratulations! Optional: Dont want to risk the problems some are having with PonyProg2000? Want to upload your program to your robot in under 30 seconds? You could buy the much more expensive (~$34) AVR ISP 2 programmer that is supported by Atmel (Digikey part # ATAVRISP2-ND). Its a much better programmer and supports many other Atmel microcontrollers. You also wouldn't need the PonyProg software and instead could directly connect with AVR Studio:
 If you decide to use this programmer, please check out this post concerning pinouts of the programmer. update 2009: You can also try the cheaper but less functional Pocket Programmer at sparkfun (see parts list on first page). It uses a 10 pin connection, but most microcontrollers today only come with 6 pin connections (including the Axon). Just keep that in mind. update 2010: Users have reported using the more affordable 6-pin ISP programmer by Pololu successfully. It works fine in AVR Studio, and includes a basic oscope, too.
 Common Compiling Error I repeatedly see this question asked in the forum. If you see the below error when you compile, it is because you didn't follow the directions carefully enough. Make sure you name your files and folders properly.
Photovore_v1.c:108: fatal error: opening dependency file
 .dep/Photovore_v1.o.d: No such file or directory
compilation terminated.
make: *** [Photovore_v1.o] Error 1
Build failed with 1 errors and 0 warnings...
0 comments:
Post a Comment